Issue
In this article I will describe how users from China can use and synchronize Evernote Sticky Notes with their localized version of Evernote, called Yinxiang Biji (印象笔记). Evernote launched the Yinxiang Biji (印象笔记) service in May 2012 in order to make Evernote faster and more reliable for around a million of Chinese users, by using local data centers.
The idea for this came from one of the visitors of this blog, his name is Fan LU. After reading my article on resolving a “411 Length Required” error in Evernote Sticky Notes, he contacted me, asking if I could make it work with the Yinxiang Biji (印象笔记) service. Later on, he has also expedited the API key request process considerably by contacting the developer team at Yinxiang, explaining what we are trying to accomplish, in their native language. And at last, he has also tested the modified Evernote Sticky Notes application and provided the necessary feedback.
If you would like, you can skip technical writing and go straight to the solution
After reading the technical documentation and examining the Evernote web service over at yinxiang.com I have came up with the plan on how to modify the Evernote Sticky Notes to synchronize with Yinxiang Biji (印象笔记). International version of Evernote at evernote.com and the Chinese version at yinxiang.com use a different domain name and also have a bit different directory structure, but utilize similar API.
After de-compiling two library files of Evernote Sticky Notes – StickyNotes.Core.dll and StickyNotes.OAuth.dll and examining the source code, I modified all entries that pointed to the evernote.com to point to the app.yinxiang.com. StickyNotes.OAuth.dll is needed for authorization process to the server and StickyNotes.Core.dll for data manipulation – uploading and modifying notes on the remote server.
After I have successfully modified the mentioned dll files, I had to file an API key activation request with the Yinxiang Biji (印象笔记). The team at Yinxiang Biji examines every application and if it fulfills all of the safety and quality requirements, it is granted access to their server.
Update (20 September 2023): Recently Evernote dropped support for older TLS 1.0 and TLS 1.1 security protocols on their servers which lead to “Could not create SSL/TLS secure channel” errors in Evernote Sticky Notes so I had to modify one additional file – StickyNotes.Wpf.exe.config. The security protocol is now chosen by the operating system instead of the app and the synchronization works once again.
I would like to point out one important fact regarding the privacy of users data – it is governed by the country in which data servers are physically located; When using Evernote International service, users data is stored on servers located in California, which means US privacy laws apply. Whereas for the Yinxiang Biji (印象笔记) service, Chinese data privacy regulations apply, since the data is stored on servers located in China.
Solution
Below are instructions on how to replace the two original library (DLL) files and one configuration file with a modified ones, that work with Yinxiang Biji (印象笔记) service. Modified DLL files are compatible with Evernote Sticky Notes v1.5.9, which is the latest available version of Sticky Notes. If Evernote Sticky Notes v1.5.9 application is not already installed on your computer, download / (alernative download link) and install it before following instructions below. You will also need to create user account over at yinxiang.com, if you don’t already have one. An account from evernote.com will not work on Yinxiang Biji (印象笔记) and vice-versa, since these are two separate services. If you would like to transfer all your notes from Evernote International to the Yinxiang Biji (印象笔记), please follow this instructions.
1. Download and unzip the modified files
Modified files – StickyNotes.Core.dll, StickyNotes.OAuth.dll and StickyNotes.Wpf.exe.config are compressed inside a .zip file. Click on the link below and download Evernote-Sticky-Notes-Modified-YINXIANG-GetGui.zip file to your computer. After the file is downloaded, you will need to unzip it in order to extract the mentioned files.
- Evernote-Sticky-Notes-Modified-YINXIANG-GetGui.zip (Downloaded 1190 times)
*File is hosted on Dropbox. If link doesn’t work, please contact me at info@getgui.com.

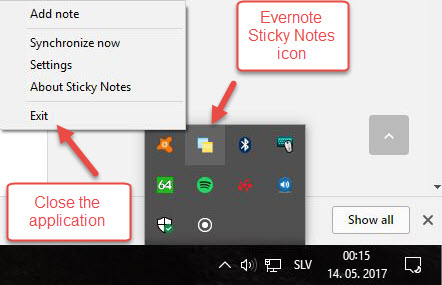
2. Close the Evernote Sticky Notes application
Evernote Sticky Notes application needs to be closed before following the next step. Make sure it is not running, by going to the taskbar and searching for the Evernote Sticky Notes icon. If the icon is present in the taskbar, right-click on it and click on “Exit”. Click “Yes” on the Exit application confirmation dialog.
3. Replace the files
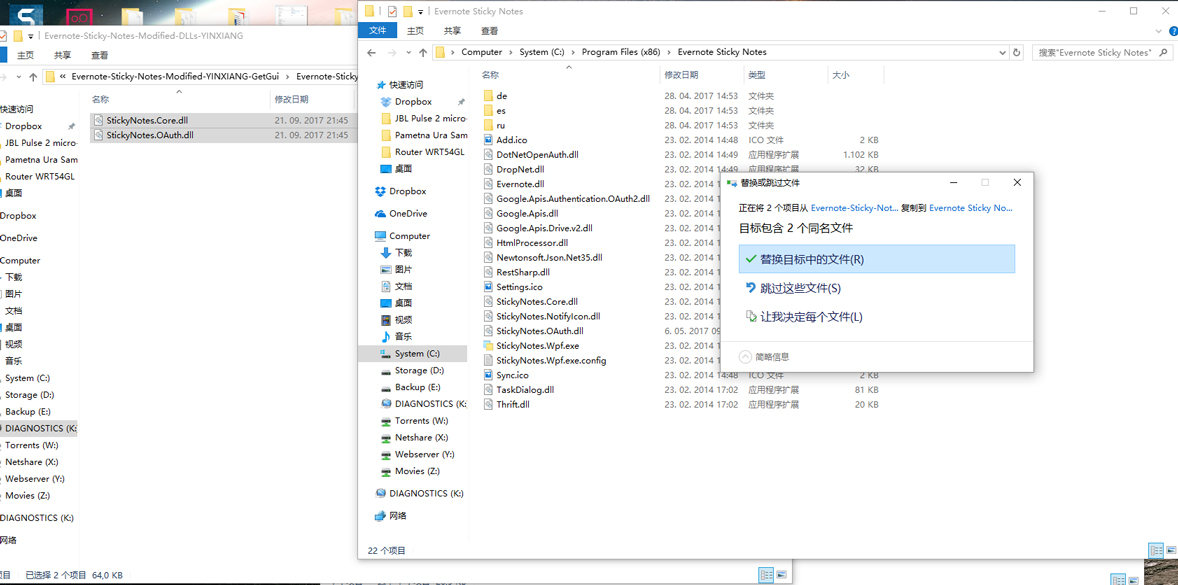
Go to the folder to which you have extracted the StickyNotes.Core.dll, StickyNotes.OAuth.dll and StickyNotes.Wpf.exe.config files and select all three files. Right-click on them and choose “Copy”. Locate the folder in which your Evernote Sticky Notes is installed, by default that’s in “C:\Program Files\Evernote Sticky Notes\” or “C:\Program Files (x86)\Evernote Sticky Notes\” on 64 bit operating systems.
Right-click on the empty space inside the installation folder and choose “Paste”. The “file replacement” or “file overwrite” confirmation dialog should open, asking if you would like to replace three files in the destination. Choose to replace the files. Restart your computer.
4. Activate Yinxiang Biji (印象笔记) user account in Evernote Sticky Notes
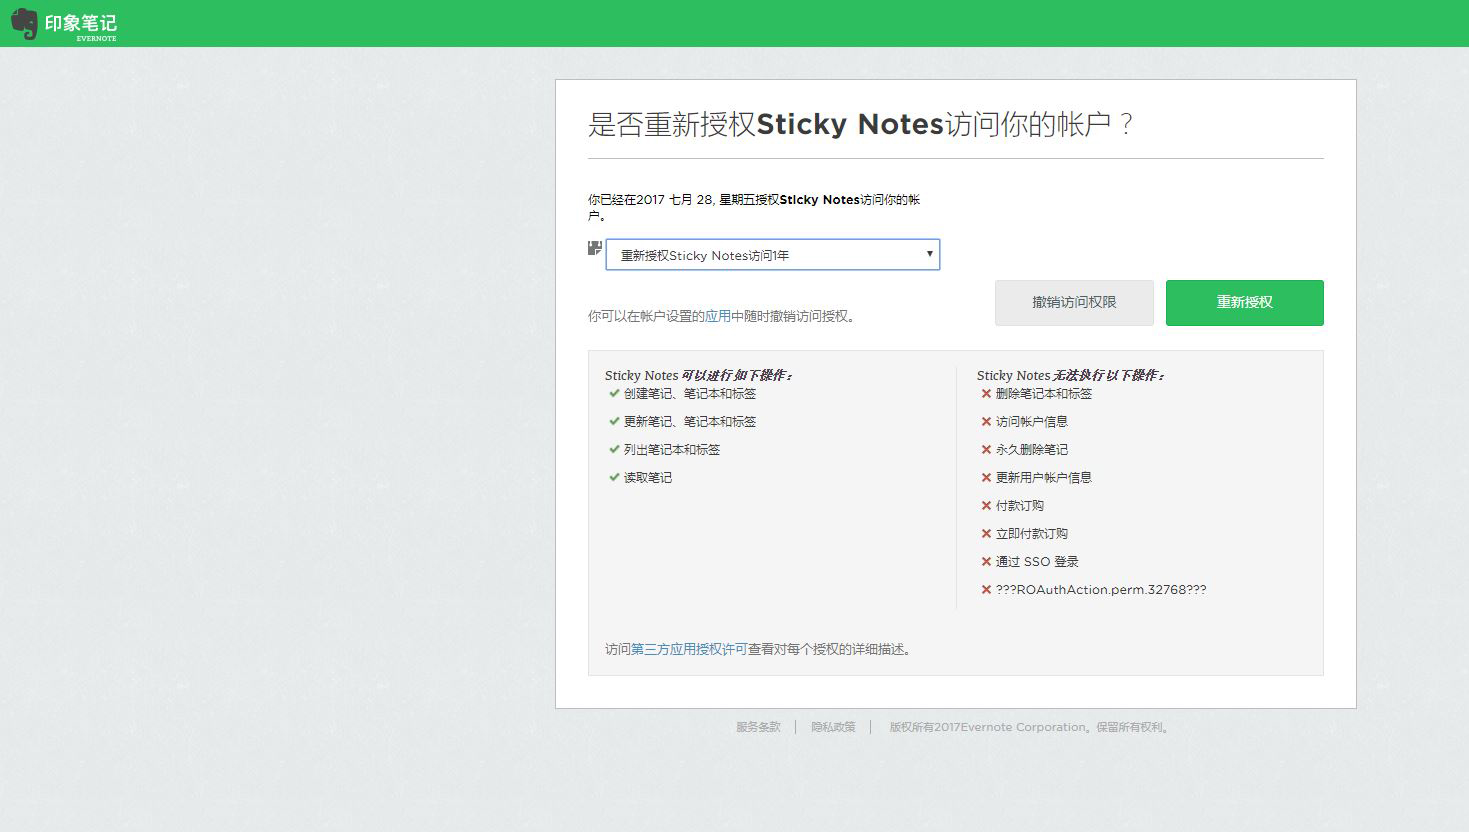
Open Evernote Sticky Notes application. Go to “Settings” and make sure that under the “Please select the account type you want to synchronize your notes with” Evernote is selected. Click on the “Request activation link” button. A working activation link should now be displayed. Click on the link and follow directions on the Yinxiang Biji (印象笔记) website to authorize Evernote Sticky Notes to access your account for a period of 1 year.
Copy the received verification code and paste it inside the verification code window in the Evernote Sticky Notes application. Click on the “Complete activation” button.

You have now successfully linked Evernote Sticky Notes application to your Yinxiang Biji (印象笔记) user account and enabled the synchronization of your local notes to the Yinxiang Biji (印象笔记) server. Activation or authorization is valid for the period of 1 year and will need to be repeated after that.
Update (02 May 2018): On 23 April 2018, the Evernote Sticky Notes authorization script was taken down from the server at Edo-Soft.com, which resulted in new authorizations no longer working. I have examined the authorization process again and wrote a script that parses and displays the authorization token provided by the Evernote server. The mentioned script was uploaded to the getgui.com server, which means Evernote Sticky Notes no longer depends on the Edo-Soft.com server to finalize the authorization process.
Update (20 September 2023):
Evernote Sticky Notes starts displaying Synchronization failed error (Couldn’t connect to server: System.Net.WebException: The request was aborted: Could not create SSL/TLS secure channel.)
This happens because Evernote recently dropped support for older TLS 1.0 and TLS 1.1 security protocols on their servers.
Solution: I have modified the StickyNotes.Wpf.exe.config file so that the security protocol is now chosen by the operating system instead of the app.
You can repair your existing Evernote Sticky Notes installation by follow the steps below:
1. Download the modified StickyNotes.Wpf.exe.config file
2. Close the running Evernote Sticky Notes (Right-click on the Evernote Sticky Notes icon in the taskbar and click on “Exit” and “Yes” on the confirmation dialog)
3. Unzip / Extract the modified StickyNotes.Wpf.exe.config file from the downloaded StickyNotesUpdatedConfigSept2023.zip file, copy it and paste it into the Evernote Sticky Notes folder (usually inside C:\Program files or C:\Program Files (x86) ), overwriting the existing StickyNotes.Wpf.exe.config file.
4. Restart your computer and enjoy the Evernote Sticky Notes synchronizing your notes once again
If you have found this blog post useful and would like to buy me a cup of coffee, please click here :)
Thanks a lot. I am a Chinese user of Yinxiang evernote. You do a good job. Can I pay you with my artworks?
Hello Naomi,
you are welcome and thank you for your feedback.
Excellent artwork, you are very talented, keep up the good work.
Hello Simon,
Thanks a lot for your work.
But I have a problem in activating my account. I opened the activation link and logged in my account of 印象笔记 successfully. Then, an error occurred after I clicked “authorize”, the next page was not found:
“Not Found
The requested URL /stickynotes/oauth/ was not found on this server.
Apache/2.4.18 (Ubuntu) Server at hosting.edo-soft.com Port 443”
So I stuck this page and can’t get the verification code.
Could you kindly give me some advice?
Hello,
the server at edo-soft.com went down a couple of weeks ago, rendering new activations impossible.
But I have since then corrected the problem by writing a new script and uploaded it to my server, which means we no longer have to depend on the edo-soft.com server.
Please make sure to download the latest library files from the blog post:
https://www.dropbox.com/s/nr51sew2jyv2mb6/Evernote-Sticky-Notes-Modified-YINXIANG-GetGui.zip?dl=1
Please let me know how it works for you.
Best Regards,
Simon
Hi Simon,
Thank you for your excellent work!
Chelsea
You are welcome and thank you for your comment.
You are welcome and thank you for your comment.
If your Evernote Sticky Notes stopped synchronizing recently and started displaying “Couldn’t connect to server: System.Net.WebException: The request was aborted: Could not create SSL/TLS secure channel.” errors, I have developed a solution which is described at the bottom of the blog post.