Issue
Customer brought in a desktop PC with a no post problem. After turning it on, there was a blank screen and a “no signal” text on the monitor, the fans were spinning and the “power on” light on the front of the case was lit. In a quick conversation the customer mentioned the problem started after cleaning the computer with a vacuum cleaner, while he was trying to get rid of the dust inside. This information shortened the diagnostic process considerably as it eliminated causes such as: bad BIOS flash or Power supply / Northbridge / Southbridge / CPU / RAM / Graphic card fail. In cases like this the problem usually lies in a dislodged connector or RAM sticks / Graphic card which is not properly seated in the slot. Damaged components as a result of the static electricity induced by the vacuum cleaner or an improperly grounded operator are also a possibility but an unlikely one.
Tools required for the repair:
- Phillips screwdriver size #1
- Sharp ESD safe tweezers or a small piece of wire
- Digital multimeter (not essential)
- Anti-static (ESD) wrist strap (not essential)
Procedure
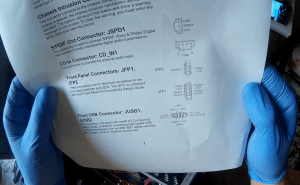
After opening the computer chassis, I noted the motherboards manufacturer and the model number. Then I downloaded the user manual for this particular board from the manufacturers website. This step is very important when diagnosing Desktop PC motherboard faults as user manual gives information about different connectors, pin-outs and beep codes.
During the visual inspection I noticed quite a few problems on this board. The front panel USB connector wasn’t properly connected to the motherboard and one of the RAM sticks was not fully seated into the slot. After solving the problems mentioned above, I tried to power on the computer. If the post was successful, I would get one beep from the computer case speaker since I have noticed it was connected to the motherboard and a motherboard manufacturer logo on the monitor. All I got was an abnormal sound from the Graphic card fan and a no post. I inspected the GPU fan and noticed the crack in the plastic near the shaft. The customer probably damaged the fan with the vacuum cleaner nozzle during the vacuuming (the fan started spinning and the sudden contact with the nozzle damaged it). Since this wasn’t a priority (it couldn’t prevent the booting), I replaced the fan later in the process but it gave me a valuable insight as it indicated a somewhat rough cleaning process.
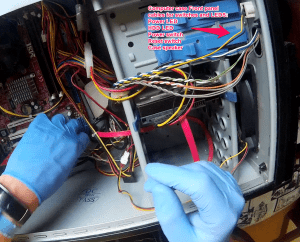
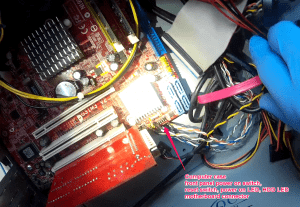
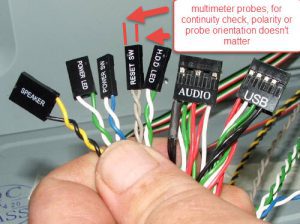
Next, I inspected the computer chassis front panel cables connecting the power button, reset button, power on LED, HDD activity LED and the computer speaker. I know from experience with older desktop computers that power and reset switches often fail, causing a continuous short condition as if the button was pressed all the time and thus prevent the computer to boot. Motherboard connector for those switches and LEDS can be found by following the cables from the computer case front panel to the motherboard, as in the pictures below.
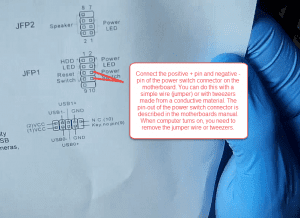
To eliminate the power button, reset button, power LED and HDD led as a source of failure, I disconnected them from the motherboard as they are not needed for the boot process of the computer. The motherboard can be jump started without the connected power button by temporarily shorting or jumping the positive + and negative – pins on the power button / switch connector on the motherboard but a user manual (available from MB manufacturers website) is needed for the particular motherboard at hand to see the pin-out information. The alternative is to take a few pictures (for reference) from different angles of the connectors before disconnecting them from the motherboard. Either way, try locating the + and – pins of the power button connector and temporarily connecting them with a small wire or sharp tweezers made of conductive material, but be very careful because the motherboard needs to be powered by electricity, thus touching other elements or pins could lead to irreparable damage on the motherboard or some other component.
In the upper case, after disconnecting the computer case switches and LEDS and jump starting the motherboard, it came to life, the picture appeared on the monitor and the beep from the case speaker indicated a successful post. Which concludes one of the disconnected switches and LEDs prevented the computer to boot.
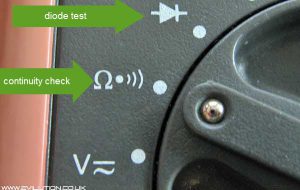
Which switch was the cause of failure? There are two ways to find out. The simplest way is by elimination – connect them back to the motherboard one at a time and after connecting each switch or LED, try to power on the computer, and when the computer fails to boot you have located the offending switch, it’s the last one connected. And the other, more scientific method, is by using your trusted digital multimeter. When testing power on and reset switch, multimeter should be in a continuity check mode, see the picture below.
With the digital multimeter in a continuity mode, put one multimeter tip into the positive connector slot of the power switch and the other into the negative one, the polarity or the orientation doesn’t matter with power on and reset switches. The multimeter should read OL or open line. If the power on or reset button is pressed at the same time, the multimeter should read zero or a few ohms, depending on the multimeter. That indicates the power on or reset switch is working properly. If the multimeter shows zero or a few ohms without pressing the button, it indicates a faulty switch. LED diodes very rarely malfunction but if the reset and power on switch are working properly, “LED diode testing” tutorials can be googled.
Solution
On the computer mentioned above, the reset switch was faulty, it was shorted and was sending a continuous reset signal to the motherboards EC chip, thus preventing the motherboard to post. How did that happen? During the fierce vacuuming, customer probably hit the switch with the vacuum cleaner nozzle or maybe pulled on the reset switch cable too hard, either way, it was damaged. I simply disconnected it from the motherboard and left it like that, as the reset switch is rarely needed. Instead, the power button can be used for rebooting the unresponsive computer by keeping it pressed until computer shuts down. What would I do if the fault was with the power on switch instead of the reset switch? The quickest way would be to replace the whole computer case, but to save customer some money I would probably try to find another compatible switch or modify the existing computer case to accept an incompatible power on switch.
Word of caution
Electronics repair is not difficult but it requires a lot of patience, calmness, focus, a steady hand and some common sense. When in doubt or when you do not fully understand something, educate yourself first by googling, before following the step in question. If you do not feel competent enough to follow a given procedure it is best to seek help from an expert technician in your area. I cannot be held responsible for any damage caused to yourself, your equipment or to the device you are repairing as a result of following this tutorial.
If you are having trouble following the steps above or perhaps just want to say thank you, you are welcome to leave a comment.
Am interested in this and I need more instructions studies or tutorials
Useful! I tried the switches first, but none of my switches were broken. Then I switched the RAM stick slot and it worked! Thanks!
Thank you for your feedback, I’m glad you repaired it